Hi everyone,
I know I have a pretty strong following of people who have loom knitted for a long time and beginners who come on my website to learn how to use looms. I have not been here for a while, and I'm so sorry. That's about to change.
I'm sorry if I haven't been able to reply to comments, and for those who have answered the comments in my absence, thank you! This blog is not going away. In fact, I want to expand this blog and give you more free and useful content. I am hoping to be able to buy a domain name for myself too.
But first, I want to ask you what you want to know. What are you struggling with? Are you confused when you look at your knitting loom, or are you frustrated that the instructions that come with your loom don't give you a satisfying end product?
I'm actually in the midst of writing a mini loom knitting e-book about knitting scarves. However there are two problems with that, and I need your help, dear readers. I would love to know what looms you are using! There are so many looms out there and so many looms that maybe have been discontinued, so I would love to know a few things. Do you want to knit scarves? What loom are you using? And what do you find confusing or intimidating about loom knitting? The e-book is still in planning mode. It's really small. I want your feedback, especially because I don't want my readers to be confused by my awkward wording when I'm writing out instructions. I'm looking for at least five people to help me out (if anyone can, seriously) and the e-book would be free. Unfortunately, I can't help them pay for any yarn used, but I really hope that people will make wonderful things.
On another great note, I recently taught my youth group how to loom knit! They're currently finishing their scarves - yes, I know it's Spring now, but they'll have totally cool winter scarves. I'll be uploading a PDF so you can follow along with them and make a scarf for yourself! I've been considering a knit-along with the PDF but I'm not sure if anyone's interested.
Please leave a comment below and make sure you don't comment as anonymous - so I'll know how to get back to you!
Thursday, April 9, 2015

Friday, April 12, 2013
Brioche
So I see that Brioche is something the loom knitters really want to know. It's fairly simple and easy to crack. I have a few pictures that I hope will help you loom knit brioche. All you have to remember to make your basic brioche stitch is yarning over (YO) and knitting, alternating the pegs where your YO are each row. You can look at these tips for knitting in the round or knitting panels. I also have some tips, to help loom knitters interpret brioche stitch patterns from regular needle knitters.
My pictures are assuming you are always knitting in the same direction (aka knitting in the round). However, read the steps over and look at the pictures.
1. Cast on.
Nothing to be said here.
2. Prep row.
a. Do not knit your first peg, but yarn over. Make sure that it is not an e-wrap YO. Make sure your YO looks like the picture below.
b. Knit over the second peg.
c. Repeat a and b for the whole row.
3. First brioche row!
a. If you remember, you left peg 1's stitch on and did a yarn over. Therefore you had 2 loops on peg 1. Knit loops over. Now peg 1 has only one loop on it. That is a BRK (brioche knit). See the next picture for a BRK.
b. Now, do not knit peg 2, but YO.
c. Repeat a and b.
4. Second Brioche Row! Doesn't this look familiar? Except...
a. Do not knit over peg 1, but YO.
b. If you remember the last row (and you will, if you are working on your knit while you are currently reading this), you peg 2 had 2 loops on it. You know what that means by now (hopefully). Knit them over (BRK).
c. Repeat step a and c.
5. Repeat the pattern.
You keep repeating step 3 and 4. And voila! You should have your brioche stitch.
Extra tips:
Please tell me if you have trouble panel knitting brioche!
My pictures are assuming you are always knitting in the same direction (aka knitting in the round). However, read the steps over and look at the pictures.
 |
| Step 1: Cast On |
Nothing to be said here.
 |
| Step 2. * sl1 (do not knit) yo, k1, * |
a. Do not knit your first peg, but yarn over. Make sure that it is not an e-wrap YO. Make sure your YO looks like the picture below.
b. Knit over the second peg.
c. Repeat a and b for the whole row.
 |
| Tip: YO. |
TIP: YO
The second peg is a YO. This is a bad picture... I know, but make sure you're not e-wrapping.
 |
| Step 3. *BRK1, sl1 yo, * |
a. If you remember, you left peg 1's stitch on and did a yarn over. Therefore you had 2 loops on peg 1. Knit loops over. Now peg 1 has only one loop on it. That is a BRK (brioche knit). See the next picture for a BRK.
b. Now, do not knit peg 2, but YO.
c. Repeat a and b.
 |
| BRK - Brioche Knit. So simple. |
TIP: BRK
The yellow coloured peg is about to be knitted over. The bottom loop is the stitch that you left alone, and the top loop is the YO you did the previous row. Knitting over will leave you with the new loop!
 |
| Step 4. * sl1 yo, BRK1 |
4. Second Brioche Row! Doesn't this look familiar? Except...
a. Do not knit over peg 1, but YO.
b. If you remember the last row (and you will, if you are working on your knit while you are currently reading this), you peg 2 had 2 loops on it. You know what that means by now (hopefully). Knit them over (BRK).
c. Repeat step a and c.
5. Repeat the pattern.
You keep repeating step 3 and 4. And voila! You should have your brioche stitch.
Extra tips:
- Panel knitting - It's really up to you to start your prep row with a yarn over, or to knit your first peg. It is also up to you whether or not you want an even or odd number of stitches, but your edges will be the same if you have an odd number of stitches.
- Working this pattern in colour - Stripes, anyone? To do this, still follow the same steps BUT remember that each peg uses the same colour yarn each row.
- Creating variations of the brioche stitch are by using alternate positions of YOs and BRKs. So, you should be able to learn new stitches. For example, one step of the brioche stitch written is "yf sl1, yo, brk1". You do not need to know "yf sl1" because it means yarn forward, slip one, yarn over for needle knitters. Just know that for a loom knitter, it means that you do not do anything for that peg except yarn over, so that there will be two loops on the peg, and then BRK the next peg.
- However, some brioche stitch variations do not look as eye-catching as they do when you use needles for knitting. This is because you will always have the same amount of tension on pegs. I've tried the pearl brioche stitch on a loom, and it doesn't look as nice.
Please tell me if you have trouble panel knitting brioche!
Thursday, January 17, 2013
Tiled Blanket pattern
 |
| New pictures - smaller but better! |
 |
| The right side up close. It's quite pleasant! |
I made this blanket for my aunts' Christmas present. I actually tiled the blanket, but it ended up taking really long to sew, so this is my amended version, and I hope it works. Please change this pattern to see fit to how you like it. Always knit a swatch and block it before going ahead of this project, because it uses a lot of yarn. This is not a double knit! It requires knitting back and forth on the loom. I took the pattern from knitting on the net squares in squares stitch. I tried to mimic the pattern in 3x3 squares in squares. I would say this is an intermediate pattern, but it really isn't. It's just that it is a tedious pattern and you need to be committed to it to finish it; the hours are long, but you have something very warm at the end. You also must be comfortable at purling stitches, and you will need to block each panel.
Onto instructions, patterns and extra links
You can also mark your progress on this project on Ravelry.
Items you need for knitting:
- 36-peg round loom (knifty knitter, loops and threads, and the large wal-mart looms are all the same)
- bulky yarn - I used 3 300g balls of Bernat's Chunkee Ombre in Wedgewood - they are considered 6, super bulky, so you can double up worsted yarn or find another bulky yarn
- sewing needle

Pattern for each panel:
Cast on using any sturdy cast-on (do not use e-wrap knit over cast-on) on 32 pegs.
Row 1 and 2: Knit.
Row 3 and 4: Knit 2, *purl 8, knit 2, repeat from *.
Row 5 to 10: Knit 2, *purl 2, knit 4, purl 2, knit 2, repeat from *.
Row 11 and 12: Knit 2, *purl 8, knit 2.
Row 13 and 14: Knit.
Row 15 and 16: Purl.
Repeat pattern (Row 1 to 16) 3 more times, and then repeat the pattern from row 1 to 14 once.
Cast off.
In total you should have 5 "tiles" of the square repeats. This is one panel.
Make 3 of these panels altogether, block them, and sew them together.
Links that should help:
Sewing - I used the mattress stitch - which means that you will notice the seam on the wrong side - it's not that bad looking, but you can also think about slipping the side stitch when you start the next row and sewing it in a different manner. Do not be scared of trying it out (though I would recommend you making 2 small samples of the pattern and then sewing them together). I avoided sewing like the plague, but this is easy, straightforward and fun! It may require for you to look at more than one website - to complete the picture in your mind on how to do it.
- http://www.dummies.com/how-to/content/how-to-join-knitted-pieces-with-the-mattress-stitc.html - This is the dummies version that gives you a drawn diagram on how to do the mattress stitch - I like how it is drawn - it is neat. You can clearly see how to start sewing, but it is hard to see the "ladders" you use because the picture does not show depth.
- http://www.knitty.com/ISSUEspring04/mattress.html - Knitty has a great tutorial (and they are located in Toronto!!) on how to do the mattress stitch for different seams. Of course, this project is just seaming the stockinette stitch. This is possibly my favourite instructional webpage for the mattress stitch. You can see how you you have to pull your stitches apart a little to find the running ladder. They also have some good tips that other pages may not talk about.
- http://www.knittingdaily.com/blogs/howto/archive/2009/04/10/mattress-stitch-tutorial-vertical-seams.aspx - I don't really like the tutorial as much, because it is hard to see where the running ladders are - but (! sorry for the exlamation marks by the way) they have a good picture of how your the seam looks on the wrong side of your knit. This is so you won't be surprised at how it looks like.
Blocking - Acrylic requires heat to block. If you don't block this big project, it will be all wavy - the easiest way is to throw your project in the dryer since this project is pretty big.
- http://rainyknits.blogspot.ca/2006/08/blocking-acrylic.html - no pictures, but this tells you how to lay out your for blocking and what kinds of things to use (an iron) to block. I found this more informative than the other articles, because the other posts were smaller projects.
- http://beadknitter.blogspot.ca/2009/03/you-can-block-acrylic.html - Pictures of an acrylic shirt pre-blocked and blocked
- http://a-modicum-of-ingenuity.blogspot.ca/2012/03/tutorial-blocking-acrylic-yarn.html - Another pre-blocked, blocked post, this time of blanket/afghan squares. Your project would be substantially larger (and I wouldn't recommend knitting squares because sewing is very time consuming - even more so when you do horizontal seaming)
Have fun, and if you have any questions, please ask! I must remind you this is a very time consuming project, and that patience is very important (to finish this project). It took me 8 days to make. This was also because I knit in squares, and then had to learn how to sew them together (which I regret a bit - I messed up a billion times).
 |
| The wrong side also looks really nice! My sister liked the wrong side more. |
Tuesday, January 15, 2013
Happy New Year! I am late
Hi everyone! I have been so busy lately I haven't been able to post. My research project took up a whole chunk of my time, and after that, I was working on finishing my Christmas presents! And now a new (and hopefully) final semester has come
I only have big looms, so I had to nix the idea of making everything using a loom, since chunky knits can use up a lot of yarn. Don't judge. I gave away 29 presents to my family members this year, although most of them were not knitted products! I am not even including acquaintances here.
Baby keyhole knit scarves, style a la anthropologie
Loom knit lap throw
I did use a loom! I made a tiled blanket of a squares pattern for my aunts. Unfortunately, I should have thought ahead and made 3 long panels. I ended up making 15 squares for the blanket and sewing them together. I actually like sewing...but the weaving in the ends was the most annoying part. I'll probably post a pattern later in the week. Acrylic is a pain to block, and I unfortunately finished the blanket too late to be able to throw it in the washer and dryer...so hopefully they'll do that to straighten it out.
Some other news: I will be having a minimum post a month. They may not be tutorials or anything...but possibly even projects I did, because those posts take up less time. Fingers crossed that I will be able to do my schoolwork and post and volunteer. I also apologize for the photos taken from my cell. I totally regret that.
I only have big looms, so I had to nix the idea of making everything using a loom, since chunky knits can use up a lot of yarn. Don't judge. I gave away 29 presents to my family members this year, although most of them were not knitted products! I am not even including acquaintances here.
Baby keyhole knit scarves, style a la anthropologie
 |
| I messed up the purple cast off (which I later fixed). The difference in size is because one baby is older than the other. I'm sure you can make something similar on the loom, but the stitches would be bigger. |
Loom knit lap throw
 |
| Mattress stitching this baby up. The giftees love colour. I regret that I could not do this project in one colour - this was the only bulk yarn with 3 rolls left during holiday time... but they still like it. It's super warm. (The next post shall be...) |
Some other news: I will be having a minimum post a month. They may not be tutorials or anything...but possibly even projects I did, because those posts take up less time. Fingers crossed that I will be able to do my schoolwork and post and volunteer. I also apologize for the photos taken from my cell. I totally regret that.
Tuesday, September 18, 2012
Toe-up cable booties

I made these earlier in the summer. After successfully and easily finishing my 2-coloured sock, I wanted to try something else. I saw someone's toe-up sock (I'm sorry, I don't remember which blog it was), and I thought to myself, why not?
Sorry for the bad picture. Anyways, notice the weird bumps near the toe? Since I did a cast-on where the toes were, I found I had to knit over very loosely at the beginning so that my loops would eventually be able to be stretched over 24 pegs (I started at 12). This could also be because the yarn didn't have a lot of give. I had extra baby yarn so I had to triple (or was it quadruple) knit with the loom.
This is different from a toe-down sock where you would stitch your sock closed at the toes.
I find the 24-peg loom pretty ugly for these cables; I guess big gauge socks are pretty ugly... but I guess using this loom would be okay for booties.
Saturday, September 15, 2012
What's in your yarn bag?
I finally finished crocheting my yarn stash bag and have slowly been transferring my yarn stash into it.

I've been practicing herringbone, as you can see. Not pictured: a dozen type of cables and a mesh t-shirt on looms, and a crochet sweater I need to start.
I've been practicing herringbone, as you can see. Not pictured: a dozen type of cables and a mesh t-shirt on looms, and a crochet sweater I need to start.
Tuesday, September 11, 2012
Youtube Round-Up Comes Back for Some More!
I'm back! Long story short, a break from the internet became an even longer affair after those Olympics set in...and then the Paralympics. I turned into a total sports zombie (even though I promised myself that I wouldn't go nuts during the Olympics again). Crazy sport-nut that I am, I was in bliss for a while.
Anyway, onto the links! Today I go back to the basics! I love Isela Phelps. Her videos are great, and they're pretty short, too!
Anyway, onto the links! Today I go back to the basics! I love Isela Phelps. Her videos are great, and they're pretty short, too!
- Simple Crochet Bind Off
- Basic Bind Off
- Knit stitch (the normal one, not that e-wrap one)
Sunday, May 13, 2012
Zig-Zag Spring Hat Pattern
Here is my pattern, finally! It's ridiculously easy! I saw a beret by Debbie Stoller (Stitch Nation) in Vogue Knitting. I changed it by doing the first section as a k2tog instead of an ssk, but that's the only difference I made. Unless you increase your stitches off the loom, or make wedges, it is difficult to make a beret, so it is just a toque. Sorry if I'm not very accurate; I really like to be flexible with patterns and therefore, I don't have any row numbers for hats. You can adjust if you want it to be a beanie (which is shorter).

41 or 40 peg loom (Knifty Knitter/ Michaels/ Wal-Mart brand does just fine)
Some people still have the 41-peg knifty knitter looms, but this pattern works best on any multiple of 4 (so you can also do it on a 36 peg loom). For the 41 peg loom, the last peg should be purled.
Yarn size and gauge don't really matter, but I used Red Heart Super Saver Yarn and doubled it up. You just need a fairly thick yarn (5 and up, or doubling up yarns) for the 41-peg loom. I broke the pattern down into 4 parts.
Stitches you need to know:
Knit (k) - normal stockinette stitch. Do not use e-wrap (twisted stockinette) stitch
Purl (p) - if you do not know how to do this stitch, please see this past post of Youtube compilations
Knit 2 together (k2tog) - In the pattern, for the first repeat of the ladder slanting to the right, your first k2tog occurs on peg 4. To do this, take the loop off of peg 3, and then put it on top of peg 4. Yarn over peg 3 and knit together as 1 on peg 4.
Slip slip knit (ssk) - ssk - slip slip knit. This is weird in loom knitting because you don't have to do anything (whereas you have to slip the two stitches off the left needle, but I digress). To make a ladder slant to the left, you take the loop off peg 3, and put it above the loop on peg 2, which will now have 2 stitches. Knit those together as 1, and yarn over peg 3.
Yarn over (yo) - this is mentioned in combination with the k2tog and ssk. You do a yo before a k2tog. Basically bring the working yarn in front of the empty peg (because you moved the stitch to the next stitch for a k2tog) very loosely. Do not e-wrap. You do a yarn over after the ssk has occu
PATTERN:
CO:
Use whatever you like. I love the cable cast on for hats, because it looks like a thin line from afar and is stretchy. A long-tail cast on is a bit thick, but it also works nicely and is elastic.
Rib stitch
Row 1: *p2, k2
repeat row 1 until 1" is knitted
Ladder slant to the right
Row 1: *p1, k1, yo, k2tog, repeat *
Row 2: *p1, k3, repeat *
Repeat row 1 and 2 until you have knitted 4" for a beanie, or 4 1/2" for a regular hat
Ladder slant to the left
Row 1: *p1, ssk, yo, k1, repeat *
Row 2: *p1, k3, repeat *
Repeat row 1 and 2 until you have knitted 6" for a beanie (or even less, if you like them really short), or 6 1/2" for a regular hat
Decrease
Because the second half of the hat uses ssk I did a decrease using ssk instead of k2tog. I didn't touch the purl stitches and only decreased on the knit stitches trying to maintain the pattern of the hat. After doing the amount wanted, bind off and weave in ends.
If you are having trouble, please read more.
Sunday, May 6, 2012
Weekend Youtube Roundup
Finally! I was supposed to finish this post two days ago, whoops! My excuse is that it was my birthday. Anyways, most of these posts are new videos that go along with articles from loom knitters circle! These are great, especially Bethany Dailey's bind off/cast off comparison.
Today's videos will show you:
Today's videos will show you:
- Chain lace stitch
- Bind off / cast off comparison for loom knitting
- slip one knit one pass over slipped stitch
Wednesday, May 2, 2012
Clever looms
No picture today, folks. I know, it's sad. I miss my digital camera too.
This is an old-timer, before high speed internet type of post. If you are shocked, proceed to look at my past blog posts instead and enjoy.
Question: Have you built a loom before?
Answer: No, but I really want to build one. You see, I live in Canada. Okay, I will admit that living in Canada has nothing to do with anything. I'm really lazy to find out if there are stores that I can go to buy finer gauge looms than a knifty knitter or any of its cousins. It's on my summer bucket list. Seeing that I'm making a small profit from knitting stuff for people, this is a very BIG possibility, because I want to be able to change my knitting gauge. The knitting gauge depends on the space between your pegs.
Question: Why would you want to make your own loom?
Answer: The main reason is because I do not have any change to spare. Any money goes towards my education. Also, I am curious. I want to know how to build one. My dad once built my mom a huge weaving loom just for her to make one afghan. He won't be helping me, but I guess history has a case of repeating itself....except this is a knitting loom. Save your money, folks! You can save so much money by making your own looms. Most of the time you will have the materials, or you can go out and buy the materials for a fraction of the price.
Question: Will you post your looms if you make them?
Answer: Of course I will. I will make them this summer for sure. However, they may be really bad. I've never been good at hands-on stuff except for knitting and painting. I just can't think in 3D. But never say never! I have never been motivated to build stuff (especially for school projects; I just didn't understand why I needed to build the Globe Theatre while studying Shakespeare). I honestly cannot tape popsicle stitcks together to make a fence in a model. It's that sad. What I'm trying to say is, I'm here to encourage everyone to try it at least once!
I've found two very useful sites to build looms.
Adjustable looms/circular-looms/double-rakes:
This is the most CLEVER way to make looms I've ever seen in my life. This is more like what I would do, because I am not that great with tools. For a finer gauge loom, you need real rubber bands (for example, the ones for hair - they don't pull your hair out like the elastic bands you get with groceries), pick-up stitcks, and spacer beads. I am so impressed. She also has adjustable looms, which I think would be great for berets. The only way I know how to make berets with knifty knitters are to increase stitches off of your loom or make wedges and sew them together. This is a quick fix! Increases or decreases will look neater, especially if you want to do a drastic decrease. As soon as I have enough money I'm going to go buy these items. I think I can pick them all up at the local dollar store.
I also have to put out a blurb, because she does great Harry Potter stuff. Honestly, that was the reason I learned how to knit. Go Ravenclaw!
Standard wooden looms:
This is if you want to make looms similar to those found on knittingboard.com. This is the standard double rake loom (as opposed to the newest all-n-one loom, which looks amazing and makes me salivate, if that is possible). It's a rustic site, but it goes step by step. I will probably be doing this when summer time actually hits (July).
Happy looming! If you don't know how far you need to space your pegs check out loom knitting help here.
Tuesday, May 1, 2012
Brioche stitch revisited

There's nothing I like more than the brioche stitch. It's nice and thick; so very sturdy. I know I posted a video about the two-colour brioche stitch tutorial on youtube, but I wanted to show how the stitch would look with one colour.
It's not a very good picture, I know. The digital camera is not with me for the moment, which disappoints me.
Anyways, its a very pretty stitch, and the video does a good job of explaining how to do the stitch. You do the steps the same way as with 2 yarns, except you are repeating the second-half round with the same yarn.
Also, I was looking up more information about the brioche stitch and found this site which is dedicated to the stitch and its various forms. Check it out! If you've done the stitch, trying the different variations should be easy.
UPDATE 04/12/13: I have added a tutorial that will hopefully help you work brioche here
Wednesday, April 25, 2012
Weekday Youtube Linkage III
Woo! After a blogging mini-break, I am ready to start up again! This weekend consisted of me doing the daisy stitch on needles and wondering how to transpose it on a loom. I'm really close to figuring it out, but it still doesn't look exactly right. It's definitely much more easy to do it on needles though.
Anyway, this week you will learn:
Anyway, this week you will learn:
- Little bow stitch (Isela Phelps is great!) - Mariposita stitch
- Rib stitch for double knitting on long looms
- Creating a triangle shawl with GoodKnitKisses
Saturday, April 21, 2012
Socks on Saturday
I used to be scared of non-hat projects. I've made a headband, a gazillion hats, a few scarves. Lately I've just been experimenting with patterns and lace, but I decided I needed to make other things
I actually made these socks a few weeks ago. I googled up a few different patterns, and looked for what people had to say on loom knitting socks. As you can see, it went pretty well. Using a knitting loom only took me a few hours to make one sock.
I don't care what non-loomers say. Socks on looms are RIDICULOUSLY easy. You are knitting in the round, and the only thing you have to learn how to do is short rows, where you knit part of the loom for a few rows before joining them up. You can use the zig-zag stitch or kitchener stitch to sew up the toe and voila! A sock!
Finer gauge looms will look even more amazing, but these looms will save you time rather than knitting with double pointed needles. I actually found this really fun. Scarves can get annoying at times, unless you're double knitting.
Also, yes I haven't threaded my work to finish because I'm probably going to frog them to do other stuff/experiments (nothing that has anything to do with hats or headbands, of course).
I actually made these socks a few weeks ago. I googled up a few different patterns, and looked for what people had to say on loom knitting socks. As you can see, it went pretty well. Using a knitting loom only took me a few hours to make one sock.
 |
| These are not the ideal yarns to use, but I just wanted to see how easy it was to make a sock. |
 |
| Despite the fact that this is bulky, I can see myself knitting more socks in the future. |
I don't care what non-loomers say. Socks on looms are RIDICULOUSLY easy. You are knitting in the round, and the only thing you have to learn how to do is short rows, where you knit part of the loom for a few rows before joining them up. You can use the zig-zag stitch or kitchener stitch to sew up the toe and voila! A sock!
Finer gauge looms will look even more amazing, but these looms will save you time rather than knitting with double pointed needles. I actually found this really fun. Scarves can get annoying at times, unless you're double knitting.
Also, yes I haven't threaded my work to finish because I'm probably going to frog them to do other stuff/experiments (nothing that has anything to do with hats or headbands, of course).
Friday, April 20, 2012
Weekday Youtube Linkage II
I have been remiss on these video posts! These are the easiest posts I make!
Today you will find:
Today you will find:
- How to knit a twisted keyhole scarf (very fashionable)
- Two-colour brioche stitch on the round loom!
- Slip with yarn in front (sl wyif)
I tried out the brioche stitch, and I absolutely love it. Every time I see using two colours in a project, I immediately turn all nerdy and think about how great it would look if I knit it in Harry Potter colours (blue and bronze for me - GO RAVENCLAW!), and I see myself getting broke in the near future.
Onto those links! |
| Right side |
 |
| wrong side - still looking good nonetheless |
Thursday, April 19, 2012
Stitch guide open AND Lace hat preview - patterns coming soon
WOO! I started the basic stitch guide (look for it as a link on your right!) The first page I did talks about the difference between the two knit stitches loomers use; the twisted stockinette and stockinette (normal). Yeah, I know people know, but I just wanted to reiterate the stuff that's already been said. It takes a bit of time for me to write these things and take pictures, so I don't know how long it'll take me to do the other ones.
Also...
I have 2 lace knitting patterns I will post! I debated the second hat, because it's so pretty...and I forgot how I did the pattern. I still don't remember one row, so I will be posting that one second!
Anyway, these 2 patterns will be coming your way soon, loom knitters! I knitted them both on the 41-peg loom, but they are easily able to be done (and more symmetrical) on the 40-peg looms. Apparently no one is able to fit into anything I make on a 36-peg loom unless you want your ears smashed, or have the hat zooming off your head.

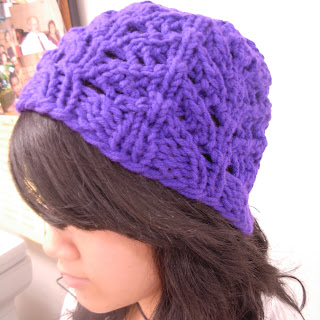
Intricate lace hat
I am bad at names, maybe I should start posting pictures on my twitter and asking people what I should name these things. This name is deceptive because it's a ridiculously easy hat to knit.
Also...
I have 2 lace knitting patterns I will post! I debated the second hat, because it's so pretty...and I forgot how I did the pattern. I still don't remember one row, so I will be posting that one second!
Anyway, these 2 patterns will be coming your way soon, loom knitters! I knitted them both on the 41-peg loom, but they are easily able to be done (and more symmetrical) on the 40-peg looms. Apparently no one is able to fit into anything I make on a 36-peg loom unless you want your ears smashed, or have the hat zooming off your head.
Zig-zag Spring hat
I don't know why, but this is such a simple hat, and this pattern really gets to me. I really love it for its simplicity, and I hope you love it too!

Intricate lace hat
I am bad at names, maybe I should start posting pictures on my twitter and asking people what I should name these things. This name is deceptive because it's a ridiculously easy hat to knit.
Lace tip - getting your yarn overs to look like regular knitting
So I've been experimenting with lace lately. Well, no, not lately. I started knitting with needles and crocheting too, but I'm getting ahead of myself. I tried to mention in my last post about getting really nice yarn overs. So here I have a sample of knitting that has a regular yarn over that one would get with needle knitting, and the e-wrap yarn over commonly done in loom knitting. There isn't much of a difference, but I think the e-wrap yarn over looks a little more messy (the knot is at the side, whereas a normal yarn over creates a nice twist) and is slightly smaller when you are making eyelets.


There are reasons why I do my yarn overs that are initially e-wrap instead of just laying the yarn in front of the peg. For one, they are loose and easy to knit, whereas just laying the yarn in front of the peg may become too tight. Even if you leave space and do it loosely, the more you knit, the more you pull on the working yarn, so it's easier to just leave it as an e-wrap and unravel it later on. This method provides the cleanest looking eyelets, and it doesn't take long at all! If you want your loom knitting to look like needle knitting, this is it.
I hope this tip helps! Proceed onto the pictures for your perusal.
Thursday, April 5, 2012
Lace tips..coming soon... with pics
I know I have non-English people reading my site (Hiya!) so I will post some pictures soon.
I've really been experimenting with lace. I've also found some quick tips that I may be able to post over Easter weekend.
Firstly, when you're making eyelets, whether you're doing ssk (decrease to left) or k2tog (decrease to right), and then doing your yarn overs (yo) for lace, the yo is an e-wrap. When they tell you to knit over the peg that you e-wrapped the row before, you should unravel the e-wrap and knit it over like a flat stockinette stitch, I've noticed that if you don't do this, your eyelets don't look like they're knitted together.
Monday, April 2, 2012
Weekday Youtube Linkage
I see that people like my links to youtube videos! I do take some time searching for these.
Today, learn how to:
Today, learn how to:
- pick up a dropped knit stitch
- pick up a dropped purl stitch
- knit 1 colour on 1 side for double knitting
Let's get to it!
Sunday, April 1, 2012
Woven herringbone
I was so stressed this week. I was also trying to transpose the daisy stitch to the loom but couldn't for the life of me figure it out. So I tried something easier and ta dah! I just transposed the stitch from the Knitting on the Net stitch database

Woven Herringbone: Multiple of 4 + 2
Row 1: k2, *sl2 wyif; rep from *
Row 2: k1, *sl2 wyif, k2; rep from *, end k1
Row 3: sl2 wyif, *k2, sl2 wyif; rep from *
Row 4: k3, *sl2 wyif, k2; rep from *, end last rep k1 instead of k2
Rows 5-12: Rep row 1-4 twice
Row 13: Rep row 3
Rep 14: Rep row 2
Row 15: Rep row 1
Row 16: Rep row 4
Rows 17-24: Reps row 13-16 twice
NOTE: To do sl wyif, slip stitch with yarn in front, lift the peg in which you are supposed to be slipping your stitch, and bring the working yarn behind the peg, and then put your stitch back on the peg.
It's a pretty dense pattern, and if anyone needs help, I'll post pics in 2 weeks.
Saturday, March 31, 2012
Lace Saturday
With the emergence of Spring I've switched to practicing lace knits. This is one of the latest ones I've tried. Unfortunately I couldn't find my biggest loom so I could only practice one column.

People said the patten was easy on ravelry. I honestly thought it was confusing because the pdf was messy, and went back and forth. The underlined words made it hard to read. Can you guess I'm not good at chem labs? I would be the equivalent of Ron in potions class. I persevered though as you see.
Check out the link and try it yourself. Tell me how it goes!
http://www.ravelry.com/patterns/library/wavy-feather-lace-stole-loom-knit
Subscribe to:
Posts (Atom)